Interfacing MQ6 Gaz Sensor with Arduino Uno
Hello, guys 👋👋welcome back to our Arduino full training course, in today's blog we will spotlight on one of the critical sensors in safety field which is MQ6 gaz sensor and one of the most used sensors in DIY project especially for gas detection,smart home projects and more, this blog is divided into 3 parts, in the first section we will explore the working principal, Pinout, and features of MQ6 sensor in the second section we will see how to interface it with Arduino and in the third part we will make an amazing project gas detection and alarm system with arduino uno such of incredible think to learn today, so be sure to read the blog until the end.
what is MQ6 sensor
MQ6 is an electronic sensor that is used to detect the presence and concentration of specific gases in the air. The most common types of gases that are detected by these sensors include carbon monoxide (CO), hydrogen (H2), methane (CH4), and propane (C3H8).
The MQ6 sensor operates based on a chemical reaction that occurs on its surface. Inside the
sensor, there is a small heater and a gas-sensitive material, typically tin dioxide (SnO2). When
the target gas comes into contact with this material, it undergoes a chemical reaction that
changes the resistance of the material.
In the presence of clean air, the resistance of the tin dioxide surface is high.
When exposed to combustible gases , the resistance drops as the gases react with the
heated tin dioxide surface, causing the release of electrons.
This change in resistance is then converted into an output signal, which can be measured as an
analog voltage. The sensor is equipped with a potentiometer that allows users to adjust its sensitivity to detect
different concentrations of gases
There is several types of gas sensors available on the market, each one is designed for specific usage condition we need to keep in mind when we select a gas sensor to take into accouant the type of target gas to be detected, the required sensitivity and accuracy, and the operating condition that the sensor will working under.
MQ6 Pinout:
- Pin1: Analog Output
- Pin2: Digital Output (High ot Low)
- Pin3; Gnd
- Pin4: VCC (5V)
Interface MQ6 with Arduino Uno:
interfacing MQ6 gaz sensor with arduino is quite simple we need just to connect MQ6 VCC and Gnd pins to 5V and Gnd respectivly then we need to choose if we will go with digital mode or with analog mode in the first mode we need to connect digital output pin to one of digital pin of the arduino and in the second mode we connect the analog output pin to an analog pin in arduino board an that's all for the hardware connection all the magic is happen in the software part (programming) which we will explore it with detail in the project section , the picture below show connection of an gaz sensor with arduino board
Gaz Detector Alarm System Project:
Now we arrive to the most exciting section in which we will build a gas detection and safety system, the project is based on an Arduino Uno board in interaction with MQ6 gas sensor who measures the quantity of mono-oxide carbon gas and display it ON lcd panel if the gas quantity is higher than the threshold (30% in our project)The Arduino will turn on an alarm (buzzer) and also turn-on fan in order to evacuate the gas present in the location, and when the quantity of the gas goes below the threshold, the alarm and the fan will sit-down and so on.
in order to create this project we need to the following components:
- Arduino Uno board
- MQ6 Gaz sensor
- Buzzer
- DC-motor
- NPN- Transistor
- LCD (16*2)
- Resistors (10K, 470)
- Bread board
- Jumper wires
the project was done on TinkerCad platform and that's the circuit and schematics for the project:
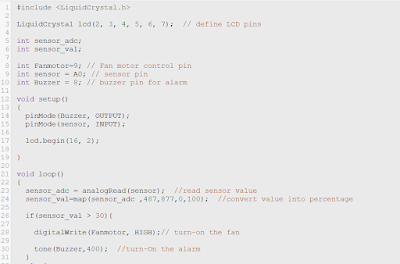
also the arduino code developped in arduino IDE and used as the project code in TinkerCad is given in the picture below:
the full project (Code, Circuit and Schematics) are available on my TinkerCad accouant in the link below:
i hope that today blog was helpful for you, if you like the content please interact comment and share the blog with your friends to help us kepping make content for you .
stay connected for more exciting blog good-bye 😎


