Intro To Arduino
History:
The word arduino was introduced for the first time in 2005 by when a group of brilliants Italians software engineers including Massimo Banzi, David Cuartielles, Tom Igoe, Gianluca Martino, and David Mellis, have being Developed an user friendly electronic board with a complete development environment in order to be accessible to a large community with a full open source hard and soft ware platform , to allow to electronics engineers ,students and hobbyists to applied their ideas easily and efficiently .
The board and its platform was Initially delivered as a tool for students at the Interaction Design Institute Ivrea(Italy) in order to create interactive projects in the Lab , but based on the simplicity, affordability, and user-friendly nature of Arduino , it have face a huge jump and a worldwide audience by attracted a big community of makers ,sparking a revolution in DIY electronics.
Architecture:
Arduino board structure contains all the essential tools for a development environment platform for embedded systems , beginning by :
- MCU: Microcontroller Unit which is the brain of the arduino board , generally from Atmel AVR family like ATMega 2560 , ATMega328P with a complete system inside including CPU (central processing Unit) , Memory, ADC (analog to digital converter) DAC (digital to analog converter), Timers , Watchdog , Interruption bus and communication bus.
- Clock Frequency: Arduino microcontrollers operate at frequencies ranging from 8 MHz to 16 MHz (Arduino Uno operates with 16MHz), providing sufficient processing power for most tasks while maintaining energy efficiency
- GPIO: stead for General purpose Input Output pins it equipped all arduino boards it can be configured by the user in Input or Outputs mode , allowing users to interface with external sensors, actuators, and other electronic components. Additionally, most Arduino boards include several analog input pins, enabling the reading of analog signals from sensors such as light, temperature, and humidity sensors. some digital Pins contain a PWM option in order to be used in control of systems like driving motor control or control power electronics converters .
- Voltage Regulator: Arduino boards incorporate a voltage regulator circuitry that ensures stable operation across a wide range of input voltages. This feature simplifies power supply requirements, as Arduino boards can be powered via USB, batteries, or external power adapters.
- USB Interface: A built-in USB interface facilitates programming and communication with the Arduino board from computer via driver who fitch the code from computer to the board efficiently and with a high speed rate .
the development software of arduino boards is called Arduino IDE (I Development Environment) which use C++ as programming language with also predefined library for various addons or features like LCD, servomotor, sensors and more we will explore all of them one by one in the coming sections.
Arduino Board Families :
Arduino have several types of boards, they differ in the type of the microcontroller so in the execution performance, in the the memory and in the number of digital and analog pin in order to deliver an efficient solution according to the need of the programmer and the requirements of the project the most famous arduino boards are:
- Arduino Uno: the most famous one it coming with ATmega328P microcontroller and 32KB of Flash memory for storing code with 14 digital I/O pins 6 analog inputs, a 16 MHz quartz crystal and have USB connection
- Arduino Mega: the bigger one and it used in large projects ,it comes with ATmega2560 microcontroller and 256KB of Flash memory for code with 54 digital I/O ,pins 16 analogs and 4 serial communication UART port ,a 16 MHZ oscillator like Uno board and also with USB connection .
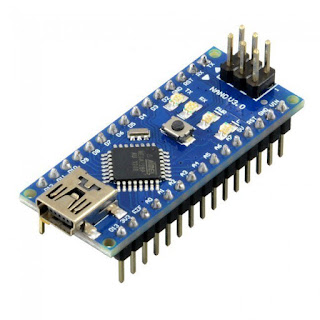
- Arduino Nano :The Arduino Nano is powered by the ATmega328P microcontroller, the same as the Uno, 32KB of Flash memory for code a 14 digital I/O pins and 8 analog pins with also same oscillator frequency 16 MHz and mini USB connection, it used for small projects and for application with reduced footprint .
In this training Course we will focus on the Arduino Uno board in which we will develop all our projects with it , but the method will be the same with all Arduino boards .


