Interfacing Seven Segments Display with Arduino
Hello guys 👋👋 In today blog we will creat our first arduino project .
for the project we will interfacing arduino Uno with 7 segments display in order to create an automatic display sequence , which consist on display numbers from 0 to 9 (ascendant manner) when
we press a button, and display numbers from 9 to 0 (descendant manner) when we press another button .this project will be done using an Arduino Uno , 7 Segments display, 2 push button and resistors and also don’t forgot the bread board .
but first of all let’s give make a quick briefing about 7 segments display :
Seven Segments Display :
The 7-segments is a simple electronic device that includes 7-LED bars arranged in such a way that represents decimal numbers [0 – 9] it also can be used to display hexadecimal digits [0 – F].


As you may have noticed, these devices are basically some LEDs hooked together in DIP packages. Hence the ease in operating/interfacing 7-segments. It’s no more than some LEDs could be hooked to i/o ports via 330Ω resistors to avoid damage caused by high current flow through the Led’s . However we should pay attention to the following couple points:
Common Cathode 7-segments: The cathode lead of all LEDs are connected together internally. So we’ll have to connect this cathode to Gnd (0v), and the anode leads to an i/o pin. Consequently, the activation of the LEDs will be achieved by setting (write 1) the respective port’s pins (Active High).
Common Anode 7-segments: The anode lead of all LEDs are connected together internally. So we ’ll have to connect this anode lead to Vdd (+5v), and the cathode leads to an i/o port. Consequently, the activation of the LEDs will be achieved by clearing (write 0) the respective port’s pins (Active Low).

Project Setup:
Now we will explore the project functionality with the following table:
Condition | Result |
Press Push button 1 (Ascendant) | Display Number from 0 to 9 |
Press Push button 2 (Descendant) | Display Number from 9 to 0 |
No button is pressed | Display the number 0 |
the required hardware to do the project are :
Material | Quantity |
BreadBoard | 1 |
Arduino Uno | 1 |
7 Segment Display | 1 |
330 ohm Resistor | 7 |
PushButton | 2 |
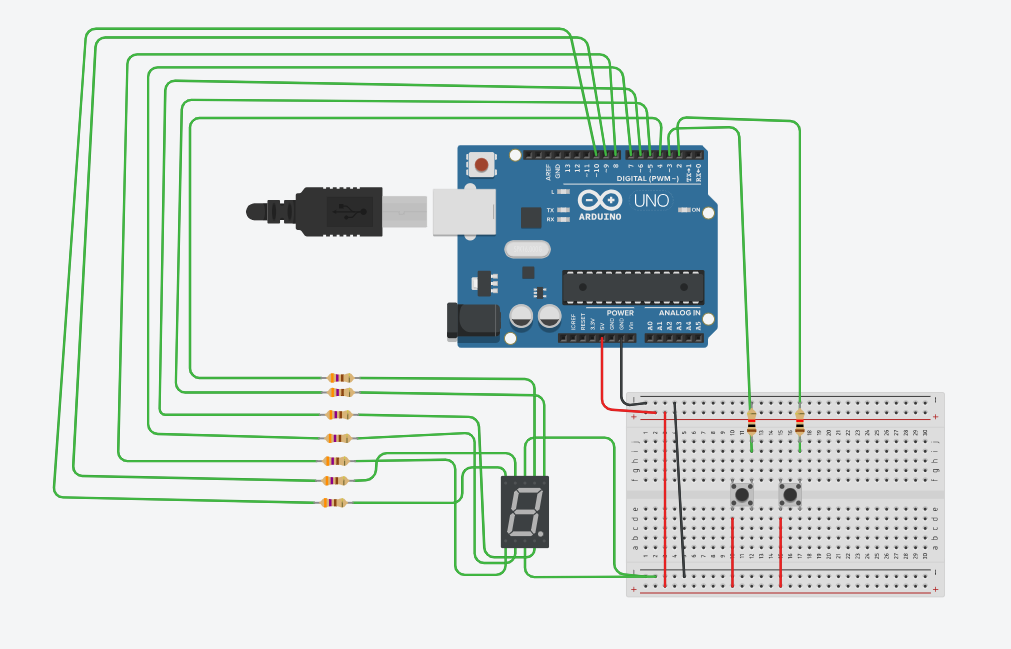
the hardware circuit is given below:
we have using a common cathode 7 segment display in order to get active high switching logic.
Software Setup:
the software arduino code is given below:
first of all we have initialise our variable : which are 2 Push button with the name
of Frwd and Revrs , the first is for the Ascendant counting and the other for the Descendant counting , and
we have declared the Seven Segments of the display one by one then we putted the min an array
called SegmentDisp in order to organize them properly and to avoid redundancy in the code ,
then we have declared the two sequence of the Ascendant and Descendant counting
in a Matrix of 10 lines and 7 colons .
Then in the setup section we have setted the push buttons as Inputs and the Segments as outputs .
in the void loop we have make the first condition if the Frwd button is pressed so it display number
in Ascendant way and back to ‘0’ , we have use 2 for() loop the first for the sequence line and
the seconds is an internal one for collons in order to simplify the code and avoid redundancy
if the Revrs button is pressed it will display number in Descendant way
if no button is pressed it displays ‘0‘.
the Simulation files with the circuit drawing are given on my TinkerCad account in the link below :
https://www.tinkercad.com/things/9e46lk5FEk3-seven-segment-display